How setup a POP3 email account in your cPanel and then in Microsoft Outlook |
Included in this tutorial:
Let's get started:
|
Setting up your POP3 email in your Hosting Account control panel |
If you have not already setup your POP3 email in your control panel you will need to do so before setting up your email in Microsoft Outlook.
|
How to setup your new email account in Microsoft Outlook |
This tutorial will explain how to setup a Cpanel POP3 email account up in Microsoft Outlook. Some versions of Microsoft Outlook are slightly different but these settings remain the same.
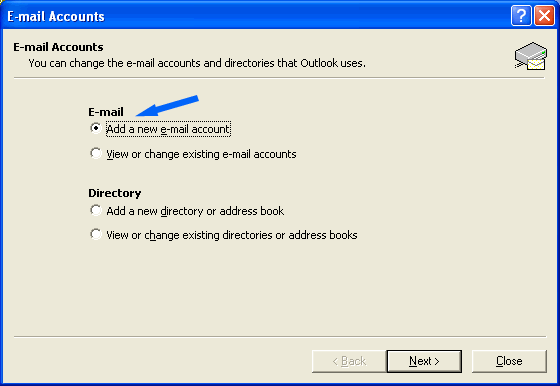
The box you see below will appear. Select:
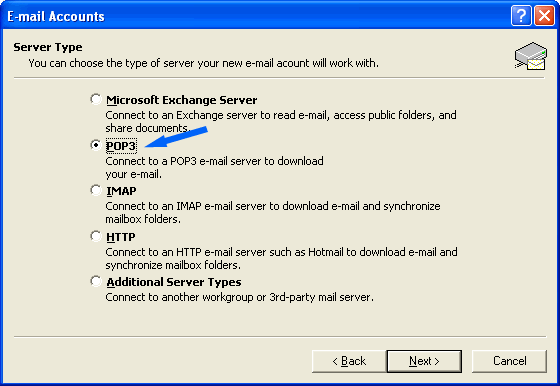
In the new window that appeared select "POP3" and then "Next" at the bottom.
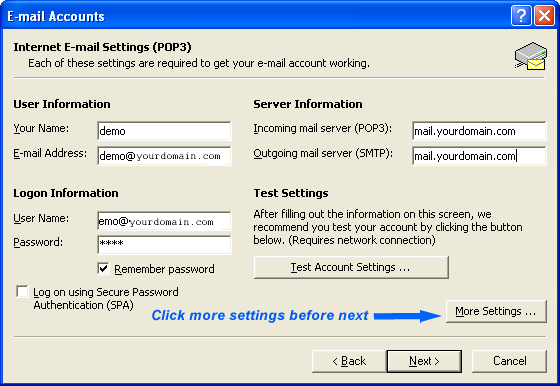
In the new window that appeared fill in your information:
Click "More Settings". Another window will appear. We need to make a few changes. We are almost finished!
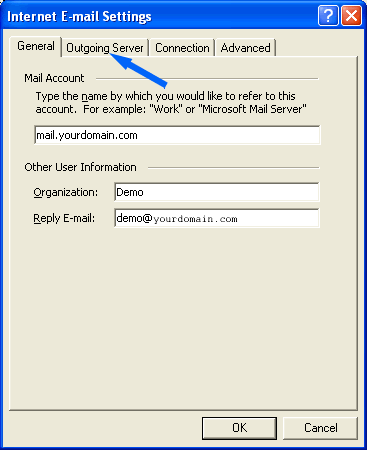
After you clicked "More Settings" a new box appears the same as below. The new box has tabs you can select across the top. We'll start with the "General" tab.
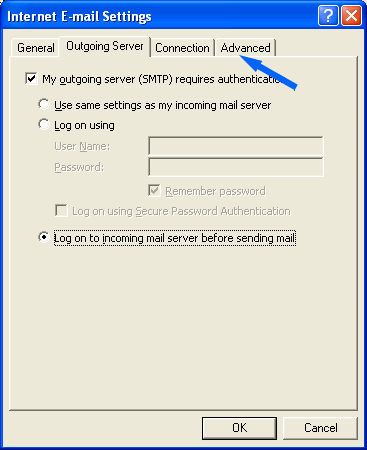
After entering your info click the next tab to the right "Outgoing Server" and a new window will appear. See below. [Do not click OK at the bottom yet].
In the "Outgoing Server" tab make sure you have exactly the same as in the image below.
Once you have verified your info is correct click "OK" at the bottom. You will be back a the main setup window. See below.
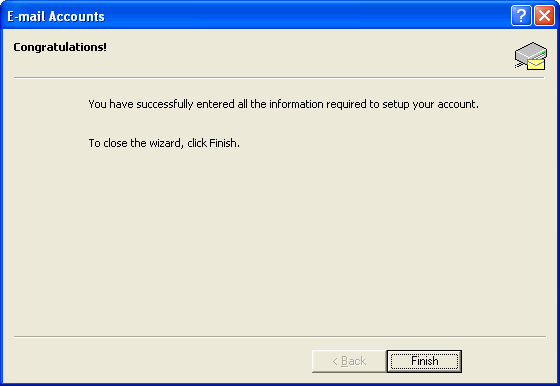
You are now back at the main window. You don't have change anything as you have already put your info in. If you like you can test account settings, or simply click "Next" at the bottom and the final window appears to tell you that you have finished.
Click "Finish".
That's it. You should now send a test email to yourself. You can click "Send and Receive" in Outlook to speed things up. If you see an error message make sure you have a good internet connection by visiting yahoo.com [or similar]. If you do have a good connection and you still see an error that means a setting is incorrect. You can go back to: > Tools >E-mail Accounts > View or Change Existing Accounts You should make sure all settings are correct and spelling is correct. |
Cpanel Spam filtering |
We run advanced spam filtering applications on all Cpanel servers. if you receive spam in your inbox it will be labeled as such. You will see {Spam} in the subject line. All mail programs have "rules" that can be applied to your incoming email. We could stop you from getting spam completely. Our spam program very rarely makes a mistake. Just in case it does we still send spam and label it as such. We recommend that you set up a spam folder in your email program and have anything labeled as {Spam} by us be re-directed into this folder immediately so your inbox does not get full. You can then delete all spam every few days after you verify it is actually spam. For instructions on how to setup "Rules" in Microsoft programs and other detailed information on filtering spam, please contact us for a tutorial. |